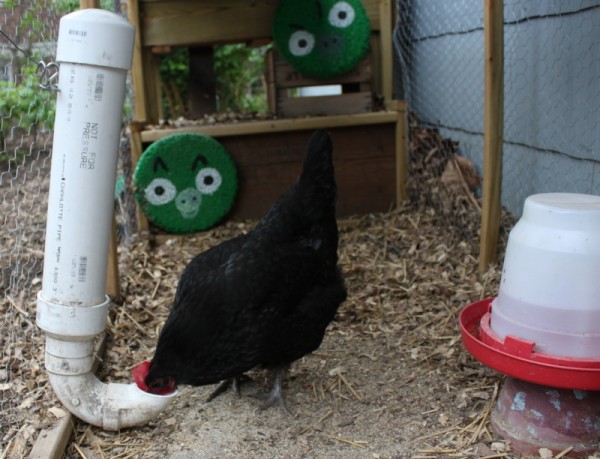
At last week's backyard chicken basics class, I admitted that our coop is a jumble of reclaimed parts and pieces, including two wooden boxes 'saved' from alley trash. Lil contributed a little whimsy with some Angry Birds pig faces painted on old rubber stepping stones. Our coop will not win any design awards but it works for us and shows that a coop can be made out of darn near anything.
 Alex's PVC chicken feeder is a bit more brilliant. Made from four pieces of durable, inexpensive pvc pipe, the feeder uses gravity to allow our hen access to grains at all times. We buy the Gregg's Organic Ohio-grains layer feed from City Folk's Farm Shop - I am so thankful to have it available locally now!
Cami Snyder, a lovely sophomore intern from Linworth Alternative High School, recorded and edited this impromptu chicken coop tour starring me, Lil, and Austra the Australorp hen. My favorite part of the video is when I'm showing off the next box and Austra is cooing.
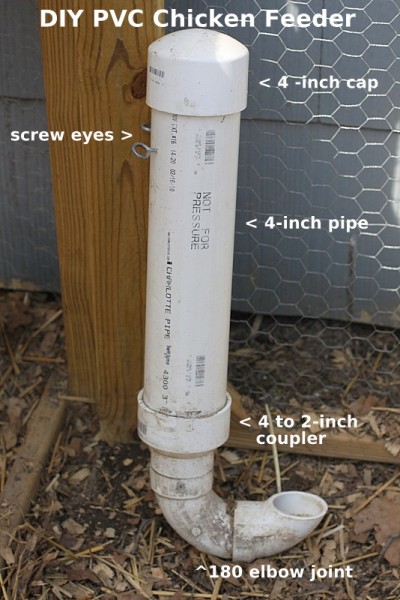
Gravity Fed PVC Chicken Feeder
Materials:
2-3 foot length of 4-inch diameter PVC straight pipe
1 4-inch slip-fit cap
1 4-inch to 2-inch coupler
1 2-inch 180 degree elbow with male end and female end
PVC cement
hand saw (we like the Japanese-style Fine Cut Pull Saw
Assembly instructions:
1. Work in a well ventilated area. PVC cement can stain, so you may want a covered surface.
2. Cut food storage compartment (4" pipe) to desired length based on capacity you want it to hold. Ours, measuring about two feet, feeds our single hen and snitching sparrows for about five days.
3. Use PVC cement to attach reducer to bottom of 4" pipe by painting the inside of the reducer with PVC cement and then setting the straight pipe in place.
4. Attach the male end of the elbow to the 2-inch side of coupler with PVC cement.
5. Using a hand saw, trim feed end of elbow to horizontal with the ground so that chickens can feed easily. Use sandpaper to smooth the edges.
6. Twist screw eyes into the back of the 4 inch pipe near the top, allowing for the cap to fit.
7. Fill feeder from the top. Twist on the cap. It may need a little sanding to release easily.
8. Hang feeder from s-hooks mounted on a wire or nails on the run rail so that the bottom is 6 inches or so off ground.
