Basement Charcuterie

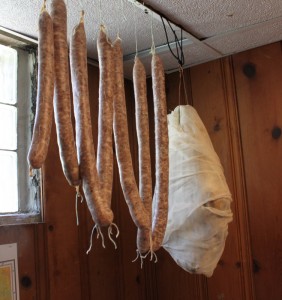
If you home cure meat, this might be a familiar site:sausage and ham in the basement

Five pounds of saucisson sec and a fifteen pound serrano-style salted air-dryed ham hanging in our basement.   Both are made from the meat of Red, the hog we slaughtered in April.  The saucisson sec will hang for three to four weeks and be taken on our long back country canoe trip in July.  The ham will dry until the fall at the earliest.

Curing meat hanging from drop ceiling stringers is just one of the pitfalls of home charcuterie.

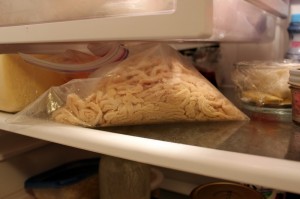
refrigerated hog casing

If you take up charcuterie like Alex has, you might also find yourself with hundreds of feet of dried hog intestine, i.e. casing, in the fridge, pictured above.  You'll probably have a stash of pink salt, that nitrite containing bacon flavoring good stuff.  Michael Ruhlman's Charcuterie book will be nearby for recipes and advice on all types of curing.  You will have a meat grinder and possibly several other sharp and dangerous tools.

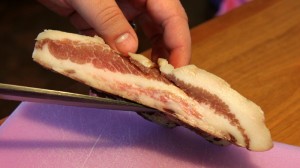
guanciale home cured jowel bacon

Of course you will also have the rewards:  spicy delicious chorizo, home cured guanciale (jowl bacon pictured above), salt cod, fresh breakfast sausage and the experience to preserve whatever comes your way.

Make it Yourself: Sausage Making

You may have read Devie the hound dog's version of making sausage.  Here's my version of the basics. I received the book Charcuterie by Michael Ruhlman last Christmas.  Since then I experimented with making my own bacon, smoking various meats and cooking confit of all sorts.  Until recently, I had not attempted to make any sort of sausage.

Sausage is the heart of charcuterie, whether it is fresh breakfast sausage or a fine aged peperone.  This Christmas, I received the food grinder and sausage stuffer attachments for our Kitchen-Aid and am in the sausage making business.  I purchased enough hog casing from Butcher Packer for about 250 pounds of sausage and have all of the adjuncts (dextrose, sodium nitrite, sodium nitrate and kosher salt) needed to make all the popular styles.

Thus far I have made fresh garlic sausage, breakfast sausage, Sauccison Sec (French dry-cured country sausage) and Spanish chorizo (also dry-cured).  I package each in a vacuum sealed bag to store in the refrigerator or freezer until I eat it.

Whether the sausage is fresh or dried, I have distilled Ruhlman's excellent sausage making advice down to a few rules:

1. Always use at least 30% fat in your sausage.  If you are using a good fatty cut of pork like pork shoulder, this should be no problem.  Sometimes you will want to add extra fat with additional cuts like fresh side or back-fat.

2. Keep everything as cold as possible.  Seriously, almost frozen is where you want to be.  I didn't do this the first time around, and the result was a mushy unworkable mess.  My procedure now is to freeze the entire grinder attachment with blades attached before making the sausage.  I then spread my meat and fat on a cookie sheet i nthe freezer until it is getting stiff and crunchy (but not frozen).  The bowl you grind into and any other tools should also be frozen.  When stuffing your sausage, keep the sausage mix in a bowl set in ice (or snow, if it is plentiful in your area as it was this winter).  Your sausage quality depends on these steps to maintain a low temperature.

3. Keep everything clean.  I haven't had a contaminated batch of sausage yet, but my experience with beer brewing has taught me that cleanliness reduces the likelihood of a batch going bad.

4. Use the specified amount of salt or nitrites.  First of all, this makes the product taste authentic.  Secondly, the proper amount of sodium nitrite is critical for food safety especially in dry-cured products.  This is the ingredient that will keep your product from spoiling, or worse yet developing botulism.  Do not skimp or leave sodium nitrite out with the thought you are looking after your health.

5. Avoid air bubbles in the casing during the stuffing process.  If they develop, prick them with a sterile needle to remove them.  It will take practice and experience to get your stuffing technique down.

Rachel took this short video when I made chorizo:

Follow these rules, use a good recipe, and enjoy homemade forcemeats.  Happy stuffing!

Make it Yourself: Sausage Step by Step

I was writing this basic sausage making post and looking at pictures I took.  I noticed Devie in every.single.picture!  She has been an integral witness to all sausage making events so I thought it would be fun to narrate from her perspective. Sausage making is awesome.  Every time the bald guy (Alex) brings the meat grinder up from the basement, I rise from my day long nap to watch the happenings and wait for the humans to make a mistake.  Someday they will drop the entire batch on the floor and I will be ready to gobble it up.

First, the bald guy gets out the fresh pork.  He chops it into chunks and puts it in the freezer for a little while.

Next comes the grinding.  The very cold pork is forced through the very cold grinder.

The meat goes back in the freezer while the bald guy prepares any seasonings and prepares the Kitchen Aid for mixing. Chilled ground pork is mixed with seasonings and binders according to the recipe.  The bald guy always yammers on about the salt ratio so it must be important.

Sometimes the bald guy stops there and forms the sausage into fresh rounds.

Other times he gets out the stuffer.  He loads up the stuffer with rinsed casing.  Usually the tattooed lady (Rachel) has to help stuff the mixed meat into the casing.  I don't think she eats meat, so I guess it's ironic that she helps make sausage.

The bald guy likes to make one long stretch of sausage and twist it into links at the end.  If it's a fresh sausage, the bald guy packs it into vacuum sealed bags right away.

For an aged sausage, he hangs it in the basement for a week or two.  Oooh does aging sausage smell good!

If I'm really lucky they will cook some sausage for me as a treat.  Sometimes I get scraps of meat along the way by helping myself.  The bald guy and tattooed lady don't seem to like that.

After all this meat observing activity, I have to sleep for the rest of the day.  Watching the people cook is exhausting!

Stay tuned for Alex's view of sausage making including sources and references.

Joel Salatin: Everything I Want To Do Is Illegal

joel salatin giving oeffa keynote"We live in an amazing country where it's perfectly legal to feed your kids twinkies, hoho cakes, and mountain dew, but raw milk, that's dangerous."  So began Joel Salatin's Saturday keynote address to the Ohio Ecological Food and Farming Association annual conference on February 13, 2010.  I attended the talk.  The writing below is my best effort to impartially summarize Salatin's opinions as he shared them. Joel Salatin is the farmer behind Polyface Farms, a revolutionary pasture based meat producing business.  Polyface Farms was featured in Michael Pollan's recent Omnivore's Dilemma and the movie Food Inc.

Mr. Salatin shared a litany of things he wants to do that are illegal (in his home state of Virginia, rules are not necessarily the same in every state):

  • Hire local kids to do farm work - power tools are legally too dangerous, yet they can be licensed to drive cars
  • Make lard and can stews - legally must be made in a commercial kitchen which can't be in an agricultural zone
  • Cure meats - laws require these must be done in a separate outbuilding, one not in an agricultural zone
  • Give tours or build a cabin for visitors - charging for these services would be entertainment, and entertainment is not allowed in an agricultural zone  (Mr. Salatin joked, "This is farmland and it's not to be for entertainment.  Nothing is funny on a farm.")

Salatin was serious when he called on the audience to be realistic about the fight for real food production.  He offered anecdotal evidence that the average citizen hasn't heard of Food Inc. and regularly eats fast food without thought to the ingredient quality.  He declared, "if our position succeeds, it will completely invert the power, prestige, and position of food lords."

Mr. Salatin explained which current paradigms must shift to have a real food system.

First, the current paradigm is that the government is more trustworthy than individuals.  Salatin, with much experience advocating for sustainable farming at the local and national level, believes the "very notion that a bureaucrat is more honest than a farmer is repugnant."

Secondly, current decision makers and food laws imply that food safety is objective.  Salatin believes it is not.  He pointed out that hunting is a proud time honored tradition that exists outside of food safety codes and is deemed 'safe' by thousands of citizens who eat venison every year.  Food safety regulations mostly come into play when food is exchanged for commerce.  He questioned, "You can give away raw milk or cheese.  What is it about exchanging money that makes it a hazardous substance?"

Next, the current paradigm is that bugs are bad.  Americans, especially, have an obsession with sterility that destroys the good bugs who could eat the bad bugs.  It is creating immune system dysfunction on an epidemic scale.  In real food circles, kefir, kim chee, kombucha and other 'good bug' fermented foods are making a come back.

In general, people are ignorant and trained to feel that freedom of choice is scary.  Salatin reminded the audience of the origin of the USDA meat stamp of approval.  In 1906 after the Jungle was published, meat purchased dropped by 50%.  Farmers lobbied congress and Roosevelt created the stamp of approval to increase credibility among consumers.  So is the way with many labels; the average consumers' fear leads to certifications that are little more than hoop-jumping red tape for small producers.

Finally, the processed food system is so pervasive that people now believe it is normal.  In reality, Salatin believes, it is not normal for most societies past to present to eat food you can't pronounce.  It is not normal to eat food you can't make in your kitchen.  As a measure of real food, Salatin proposes don't "eat any food that wasn't available before 1900."

Salatin's speech ended with several empowering alternatives for those looking to produce and consume traditional whole foods.

1) Don't comply.  Salatin suggested opting out of the industrial food system.  Find your own kitchen.  Buy directly from the farmer and talk to them about where and how their goods were raised.  "Take your TV up to a high hill with a deer riffle,"  he said, advocating that people avoid the traditional media focus on the quick, easy, and cheap.

2) Create a non-commerce system.  Community Supported Agriculture arrangements have passed the regulations test and allow farmers to offer a variety of products.  Creating private clubs and herd share programs are other non commerce alternatives.  Some farmers have even had success giving their product away and make their money through donation bucket collections.

3) Look for loopholes and renaming opportunities.  Read regulations carefully and follow them literally.  Salatin gave the example of a farmer who needed to follow a regulation that required a wall with a window in one of his buildings.  Size was not mentioned, so he built a dog house sized wall and window in the shelter.  A raw milk producer relabeled her milk as 'pet food' and is able to sell it without concern about anti-raw regulations.  Another sells her artisanal cheese as 'fish bait' because there are no regulations regarding fish bait in her area.

Salatin concluded his talk demanding "we need a constitutional amendment guaranteeing every American the freedom of food choice. This heritage, sacred, noble food production system will not be wiped from our culture."

You can read more about Salatin in his many books including Everything I Want To Do Is Illegal: War Stories From the Local Food Front
The Flavor of Christmas

Tastes and smells are a necessary component to memory.  Foods bring us back to a place and time, defining everyday and holiday experiences.

At Christmas time, the formal Christmas Eve dinner is that memory maker for me. The last two years we have hosted a meal for friends and family at our house, as we will again this year. The menu varies slightly each year but typically follows an old English style. Dishes are always made from scratch. This year our menu is:

Stuffed whole goose (raised at 2silos farm) Roasted sweet and white potatoes Steamed green beans Mushroom pie Green salad Cranberry sauce Mini yorkshire puddings Cranberry champagne cocktails

My sister, the pastry school attendee, will be bringing the dessert.  She just finished a chocolate class.

What tastes do you associate with Christmas?  What are you making this year?

Make it Yourself: Fruitcake

Two years ago, my aunt brought fruitcake to our holiday celebration.  I can't say I had ever tried fruitcake before, but this was delicious!  Juicy, rich, alcoholic, and sweetened by real fruit not sugar or fluorescent candied stuff -  what could be wrong?

Last year, I made fruitcake myself.  I split the batter between one large and two small loaf pans.  Because of my unpredictable oven, the smaller ones burned on the bottom.  I was disappointed but planned to enjoy the larger loaf even more.

Sometime in the brandy basting process, the dastardly Food Hound struck again.  That's right, Devie consumed the entire large loaf.  A pound or more of dry fruit, alcohol, butter, all of it.  AGHHH!!!!  I hoped she would die of overeating but it never seems to bother her.

This year I am determined to bake and eat the fruitcake.  This year's attempt is currently aging in an upper cabinet. (Don't you wish you had opposable thumbs now, Devie?!)

I use a slightly modified version of Alton Brown's Free Range Fruitcake recipe, below.    I dare you to make it yourself - no one re-gifts this cake!

Ingredients

  • 4 cups dried fruit (Choose your favorites. This year, I used golden raisins, cranberries, apricots, and a berry mix from Trader Joe's.)
  • Zest of one lemon, chopped coarsely
  • Zest of one orange, chopped coarsely
  • 1/4 cup candied ginger, chopped
  • 1 cup bourbon (gold rum is traditional and called for in Alton's recipe but bourbon is my favorite)
  • 1 cup sugar
  • 5 ounces unsalted butter (1 1/4 sticks)
  • 1 cup unfiltered apple juice
  • 4 whole cloves, ground
  • 6 allspice berries, ground (if you are local and want some of these I have plenty to share)
  • 1 teaspoon ground cinnamon
  • 1 teaspoon ground ginger
  • 1 3/4 cups all purpose flour
  • 1 1/2 teaspoons salt
  • 1 teaspoon baking soda
  • 1 teaspoon baking powder
  • 2 eggs
  • 1/4 to 1/2 cup toasted walnuts, broken (Alton's recipe calls for pecans)
  • Brandy for basting and/or spritzing

Directions

Combine dried fruits, candied ginger and both zests. Add bourbon and macerate overnight.

Place fruit and liquid in a non-reactive pot with the sugar, butter, apple juice and spices. Bring mixture to a boil stirring often, then reduce heat and simmer for 5 to 10 minutes. Remove from heat and cool for at least 15 minutes. (Batter can be completed up to this point, then covered and refrigerated for up to 2 days. Bring to room temperature before completing cake.)

you could stop right here and have a delicious topping for ice cream

Heat oven to 325 degrees.

Combine dry ingredients and sift into fruit mixture. Quickly bring batter together with a large wooden spoon, then stir in eggs one at a time until completely integrated, then fold in nuts. Spoon into a 10-inch stoneware loaf pan and bake for 50 minutes. Check for doneness by inserting toothpick into the middle of the cake. If it comes out clean, it's done. If not, bake another 10 minutes, and check again.

Remove cake from oven and place on cooling rack or trivet.  Baste or spritz top with brandy and allow to cool completely before turning out from pan.

When cake is completely cooled, seal in plastic wrap or a tight sealing, food safe container.  Store far away from evil dogs.

Every 2 to 3 days, feel the cake and if dry, baste with more brandy. The cake's flavor will enhance considerably over the next two weeks.

Wooden Countertops Tutorial Part Two

This is a continuation of the Tutorial.  Part One covers materials. Construction

First, dimensions of the surface to be covered are measured, and the plywood subcounter is cut to shape.  Screw this into cabinet sides immediately so the kitchen can be used. We lived with construction plywood counters for just about a year, so I suppose you could just stop here if you were ok with counters that can't be thoroughly cleaned and are pretty ugly.

not pretty, but it works

Care needs to be taken with complex shapes so that the dimensions are accurate and the countertops fit when installed.  I worked in the garage and made trips inside many times to measure, dry fit, and trim.

Next, the solid wood edge pieces are cut to length.  I fashioned the edge pieces to hang down so that the edge makes the countertops appear to be 1.5” thick.

Now the edges are installed on the sides of the plywood using the biscuit jointer.  For those unfamiliar with a biscuit jointer, it cuts slots in both edges of wooden pieces on their butted sides.  Wood glue is inserted in the slots, biscuits inserted in one side, and the pieces are fit together.  They are clamped and allowed to dry thoroughly.

The entire assembly is finish-sanded to 220 grit and then the polyurethane is applied.  I let each coat dry completely, and then roughed the surface with 00 steel wool before applying the following coat.

I applied 6 coats of polyurethane and then finished it by buffing with 0000 steel wool.  If we notice down the road that the polyurethane is damaged or wearing, we can simply sand and then re-coat with additional layers as needed.

After this, the countertops are dropped into place and secured with liquid nails.  With a generous application of liquid nails between the two sheets of plywood, you essentially have a one-piece solid surface.  Edges around the sink are protected with clear silicone caulk.

Final Look

We are thrilled with the look and feel of the wooden countertops.   The cherry contrasts just enough to be pleasant and not distracting.  They are simple to clean and in the month since installation show not a single scratch.  We look forward to years of enjoying the beauty and function of these affordable counters.

Wooden Countertops Tutorial Part One

At the request of several readers, I (Alex, Rachel's husband) wrote this tutorial about the installation of our wood countertops on the cheap. even the hound can tell a good counter when she smells it

Advantages/Disadvantages to Wood

To begin with, you need to decide if a wooden surface is right for you.  If you already have wood cabinets, more wood on the countertops can lead to an overload of natrual products in a kitchen.  Consider using a contrasting wood for the countertop than you use for the cabinets.  In our case, we chose cherry for the countertops to contrast with the oak cabinets both because of the aesthetic quality and because we already had some scrap cherry.

Another consideration is that wooden countertops are likely to eventually wear in contrast to solid surface or granite which claims to be durable for decades.  We figure that with proper upkeep (sanding and refinishing as needed) wooden counters will last at least ten years at which point we can replace them for another meager $400.

Because of the multiple coats of polyurethane finish, these counters are as antibacterial as any.  They are waterproof and can be cleaned with soap and water or gentle cleaners just like higher end materials.

Material Selection

Traditional wood countertops use solid planks of the chosen wood for the surface.  However, this material offers no cost advantage over other solid-surface countertops.  For this project, we wanted to save a considerable amount over the $40-100/square foot that solid-surface countertops can run.  To this end, we chose to make the bulk of the countertop from cabinetry-grade cherry plywood with the edges being finished with solid cherry.

Wood is a earth friendly material source.  It is renewable when harvested and planted correctly.  The solid edges are easy to fashion from scrap wood you might already have.  The plywood remnants can be used for other small projects.

There are some obvious disadvantages to plywood.  Mainly, the veneer surface is very thin and prone to damage if not protected.  The use of several coats of an appropriate polyurethane finish will serve to protect the surface.  Also, the plywood is prone to water damage if water penetrates past the finish to the wood.  To combat this, care must be taken to ensure that the edges of the countertop are finished just as thoroughly as the surface is.

The cherry plywood for this project cost $95/sheet (4'x8') at Woodwerks in Gahanna, OH.  This project required two sheets of plywood because of the specific shapes we needed.  The solid cherry for the side cost nothing as I already had it on hand (a gift from a friend years ago).  I simply had to thickness plane the cherry down to appropriately dimensioned planks and it was ready for use.

I also purchased an inexpensive biscuit jointer for $45 from Harbor Freight.  While much cheaper than comparable models at a home improvement store, it is of good construction and performed adequately for this job.

The polyurethane finish we used is Minwax Helmsman Spar Urethane, marketed specifically for use on countertops.

A sub countertop of 3/4 inch construction plywood was screwed into cabinets.  This provided a working surface the  during the 12 month waiting process and remained in place under the new counter.

Continue to Part Two for details about the construction.