Bulk Flour Group Buy

We bake nearly all our own bread.  Through experimentation, we have found King Arthur to be our favorite brand of flour.  Unfortunately, we have yet to find any local flour that can match the quality and consistency of  King Arthur products.  Fortunately they are a co-operative business with values I can respect even if the wheat is not locally sourced. Last spring I organized a group buy of bulk (50 pound bags) King Arthur flours.  I am pleased to expand the offer to Columbus Ohio blog readers this time around.

Here's how the order will work:

1) Reply in the comments section or by email with your order by Tuesday, January 12 at 8 pm. 2) I will email payment instructions on Tuesday evening. 3) Payments are due by Sunday the 17th. 4) Delivery will be Wednesday the 20th or Thursday the 21st to Sprout Soup. 5) Rapid pickup is necessary.  The bags take up a huge amount of space and we want to be respectful of Sprout Soup.  If you order, please make plans to visit Sprout Soup on Thursday evening or Friday morning to pickup.

Prices and descriptions are below:

FLOUR SPECIAL MALTED ENRICHED 50# $18.49 FLOUR WHEAT WHOLE WHITE 50# $22.41 HARVEST FLOUR SIR GALAHAD 50# $15.79 HARVEST FLOUR SIR LANCELOT 50# $22.99

Special Malted Enriched is a medium protein general purpose wheat flour. Wheat whole white is 100% whole wheat ground as white and substituted up to 100% in most recipes.  I use this for everything except pie crust, roux, and 50% bread flour in sandwich bread. Sir Galahad is an enriched flour from hard red winter wheat. Sir Lancelot is enriched hi-gluten bread flour.  Necessary for high quality bread.

Here's a link to the specific properties of each flour: http://www.kingarthurflour.com/professional/documents/BFS-Specs-Customer-Copy.pdf

Please ask any questions you have.   I'll post about bulk flour storage before the order gets here if you need some ideas about what the heck to do with 50 pounds of flour!

Tastes of Summer

There are inches of snow on the ground and inches more to come.  I am bored with winter vegetables and itching to get in the garden.  Solution?  Rob the larder. I have serious love for the word larder.  Isn't it fantastic?

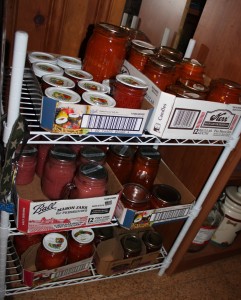
This summer I canned tomatoes, applesauce, barbecue sauce, peach jam, strawberry jam, ketchup and tomato paste.  It was hours of work to pick and process all these treasures.  The matching little jars have laid in wait in the basement for many months.

The payoff is now, in mid winter, when I grab a jar and enjoy the fruits of my labor.  Sunlit sweetness and fresh air combine with the luscious appeal of handmade to make me transcend the winter blues one biteful at a time.

How do you taste summer in these winter months?

Confit Canard (Duck Confit)

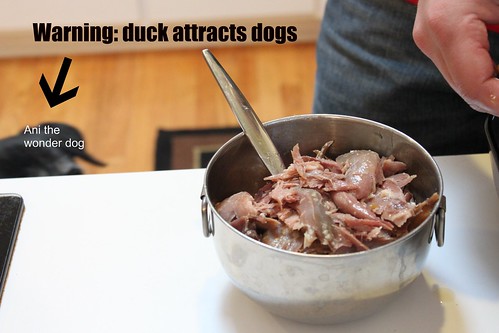
So what do you do with all of the wonderful rendered fat from the roasted duck?  You didn't throw it away did you?  Rendered waterfowl fat is one of the most delicious cooking mediums out there.  One of the tastiest dishes that can be made with it is Confit Canard also known as Duck Confit.

Confit is a term that is usually applies to meat that is slowly cooked submerged in fat.  Is it healthy?  Absolutely not.  It is, however, delicious and not in the least bit greasy despite the cooking method used.

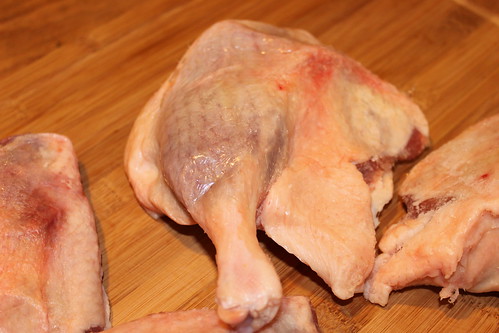
For duck confit you need the the leg, thighs, and fat of a duck.  You can buy whole ducks and butcher them, reserving the breast for other use or buy the legs on their own.  In Columbus, both whole, parts, and fat can usually be found at North Market Poultry and Game in the North Market.

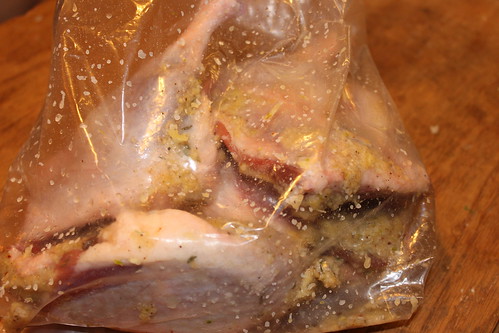
Once you have the legs, trim of any excess skin and pat them dry.  Coat them in a mixture of kosher salt, chopped garlic and thyme and let them rest refrigerated for at least 12 hours.

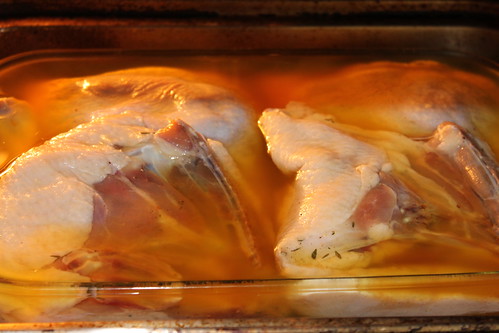
After the resting period, rinse the legs in cold water and again pat them dry.  Place them in a shallow pan and fill the pan with enough rendered fat to cover the legs.  Michael Ruhlman advises that you can use a mixture of 50% fat (any combination of poultry fat) and 50% olive oil.  By our experience he is absolutely correct, and the end result is just as flavorful.

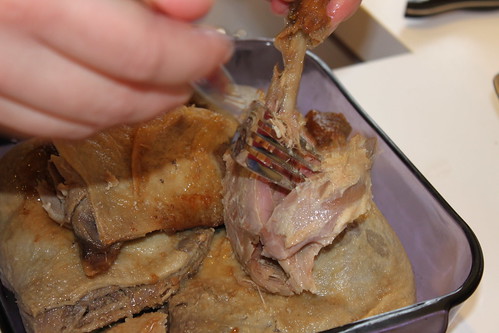
After covering the legs in the fat, place the roasting pan in the oven on 200 degrees and let it cook.  The process can take up to 12 hours and can be completed overnight if you wish.  You will know the cooking is finished when the meat pulls easily away from the bone of the leg.

Traditionally at this point you would let the meat cool underneath a layer of fat and store it refrigerated for many months as a preserved food product.  It is ideal to let confit rest for at least a week to fully develop its flavor but even a few days will do if you are in a time crunch.

After this fat nap, the meat can be used in many ways.  If you warm the fat back up, you can remove the legs easily, pat them dry and shred the meat from the bone.  This can then be used to top toast points, make a creamy spread or as a salad topper.

An alternate treatment is to reheat the leg whole in a saute pan and serve it as a main course.  The fat you cooked it and stored it in can be strained and re-used multiple times; there is no need to throw it away.

For a Rose Bowl party this evening, we served the confit pulled over cranberry sauce on toasted homemade bread.  Guests loved eating it and watching the Ohio State Buckeyes cook the Oregon Ducks!

This post was co-written with Alex.  In the interest of research, even vegetarian Rachel tasted and enjoyed the confit.

How to Cook a Duck

The Rose Bowl is days away. The Ohio State Buckeyes are playing the Oregon Ducks.  Alex and I are both alumni and football fans.  We are bringing a duck confit dish to a Rose Bowl party to poke fun at the opposing team's mascot.

One of the most common complaints about duck (or goose for that matter) is that the meat is greasy or dry and unpalatable after roasting.  Usually this is a result of not cooking it long enough to render away sufficient fat, or cooking it far too long and drying out the meat.

The method we use for waterfowl including duck and goose is based on Julia Child's technique in The Way to Cook.  This method encompasses a preliminary steaming step followed by a more traditional roasting process.  The end result is succulent meat that is tender, moist and not in the slightest bit greasy.

To begin, buy a fresh duck or goose from a reputable source.  Our favorite Columbus sources are North Market Poultry and Game and Weiland's Market.  Brine the bird in the refrigerator for up to twelve hours.

Trim the cavity of the bird of excess fat and trim the wing tips.  Remove any giblets from the cavity and reserve these with the wing tips for making stock/gravy.  You may or may not want to play with the bird at this time, giving a puppet show with Rose Bowl references.

Aggressively salt the cavity of the bird and place it breast up in a metal roasting pan on a rack so that it is at least an  inch off the bottom.  Fill the pan to just below the bird with liquid.  Any mix of water, wine, apple cider or orange juice works well, keeping in mind that flavor will be imparted to the bird.  A few aromatic vegetables like celery and onion are welcome additions to the liquid.
Cover the pan tightly (aluminum foil is fine) and place on the stove top over medium heat to begin steaming.  Keep the liquid at a simmer, and add more as it boils away.  The steaming time will vary by the size of the bird.  A small duck (5 pounds) will take only half an hour while a large goose (12 pounds) will take about an hour.  When the steaming is done, remove the bird to a tray and drain the liquid from the roasting pan.

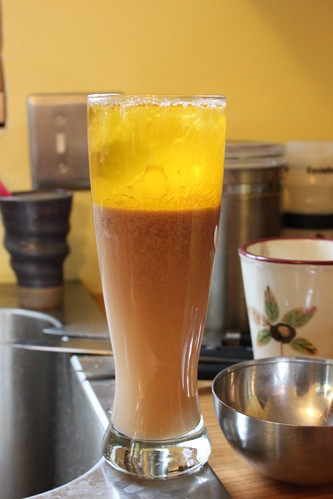
For a large goose you may collect as much as 3 cups of fat from the steaming process.  Reserve the fat for future cooking use.  It is easily poured into ball jars, cooked, and then refrigerated.

At this point, stuff the bird if that is your plan.  A liver and fruit stuffing suits the flavor of duck and goose well, but your tastes may vary.  If you do not want to stuff it, place an onion and some aromatic herbs in the cavity to add flavor.

After stuffing, truss the legs together and place it breast side down in the roasting pan.  Put it in the oven at 350 degrees.  For a smaller bird, you will want to flip it over to finish roasting after one hour.  For a larger bird, flip it over after one and a half hours.  Finish roasting breast side up for 30 minutes to brown the skin.  The meat should feel tender but slightly springy when pressed.

Remove from the oven and allow the bird to rest for 15 minutes while juices redistribute.  Carve the bird up like you would a chicken and it is ready to eat. As you carve it, you will notice that there is still some fat in the bird.  Because a vast majority of the fat was steamed away, the meat will be moist and taste delicious without being greasy.  Also, you might notice that around the legs the juices will still be slightly red.  This is perfectly fine.   If you buy your poultry from someone you know or trust, there should be no worries about food-borne diseases.

GO BUCKS!   COOK THOSE DUCKS!

Stay tuned for the Confit Conard (duck confit) technique post Thursday.

Having a Cool Yule

The goose was cooked and enjoyed.  Devie watched all proceedings to make sure no bit was wasted.  Look for a post later this week related to the Rose Bowl about how to cook duck and goose.

After snuggles and stories, Lil went to bed.

Lil's big present this year is an indoor swing.  We installed it (well, Alex installed and I tested) between the dining room and living room. Yes, I do hope I get a robe for Christmas that doesn't make me look like a five year old.

From my family to yours, Happy Holidays.  May your gifts be plenty and treats be delicious!

The Flavor of Christmas

Tastes and smells are a necessary component to memory.  Foods bring us back to a place and time, defining everyday and holiday experiences.

At Christmas time, the formal Christmas Eve dinner is that memory maker for me. The last two years we have hosted a meal for friends and family at our house, as we will again this year. The menu varies slightly each year but typically follows an old English style. Dishes are always made from scratch. This year our menu is:

Stuffed whole goose (raised at 2silos farm) Roasted sweet and white potatoes Steamed green beans Mushroom pie Green salad Cranberry sauce Mini yorkshire puddings Cranberry champagne cocktails

My sister, the pastry school attendee, will be bringing the dessert.  She just finished a chocolate class.

What tastes do you associate with Christmas?  What are you making this year?

Make it Yourself: Fruitcake

Two years ago, my aunt brought fruitcake to our holiday celebration.  I can't say I had ever tried fruitcake before, but this was delicious!  Juicy, rich, alcoholic, and sweetened by real fruit not sugar or fluorescent candied stuff -  what could be wrong?

Last year, I made fruitcake myself.  I split the batter between one large and two small loaf pans.  Because of my unpredictable oven, the smaller ones burned on the bottom.  I was disappointed but planned to enjoy the larger loaf even more.

Sometime in the brandy basting process, the dastardly Food Hound struck again.  That's right, Devie consumed the entire large loaf.  A pound or more of dry fruit, alcohol, butter, all of it.  AGHHH!!!!  I hoped she would die of overeating but it never seems to bother her.

This year I am determined to bake and eat the fruitcake.  This year's attempt is currently aging in an upper cabinet. (Don't you wish you had opposable thumbs now, Devie?!)

I use a slightly modified version of Alton Brown's Free Range Fruitcake recipe, below.    I dare you to make it yourself - no one re-gifts this cake!

Ingredients

  • 4 cups dried fruit (Choose your favorites. This year, I used golden raisins, cranberries, apricots, and a berry mix from Trader Joe's.)
  • Zest of one lemon, chopped coarsely
  • Zest of one orange, chopped coarsely
  • 1/4 cup candied ginger, chopped
  • 1 cup bourbon (gold rum is traditional and called for in Alton's recipe but bourbon is my favorite)
  • 1 cup sugar
  • 5 ounces unsalted butter (1 1/4 sticks)
  • 1 cup unfiltered apple juice
  • 4 whole cloves, ground
  • 6 allspice berries, ground (if you are local and want some of these I have plenty to share)
  • 1 teaspoon ground cinnamon
  • 1 teaspoon ground ginger
  • 1 3/4 cups all purpose flour
  • 1 1/2 teaspoons salt
  • 1 teaspoon baking soda
  • 1 teaspoon baking powder
  • 2 eggs
  • 1/4 to 1/2 cup toasted walnuts, broken (Alton's recipe calls for pecans)
  • Brandy for basting and/or spritzing

Directions

Combine dried fruits, candied ginger and both zests. Add bourbon and macerate overnight.

Place fruit and liquid in a non-reactive pot with the sugar, butter, apple juice and spices. Bring mixture to a boil stirring often, then reduce heat and simmer for 5 to 10 minutes. Remove from heat and cool for at least 15 minutes. (Batter can be completed up to this point, then covered and refrigerated for up to 2 days. Bring to room temperature before completing cake.)

you could stop right here and have a delicious topping for ice cream

Heat oven to 325 degrees.

Combine dry ingredients and sift into fruit mixture. Quickly bring batter together with a large wooden spoon, then stir in eggs one at a time until completely integrated, then fold in nuts. Spoon into a 10-inch stoneware loaf pan and bake for 50 minutes. Check for doneness by inserting toothpick into the middle of the cake. If it comes out clean, it's done. If not, bake another 10 minutes, and check again.

Remove cake from oven and place on cooling rack or trivet.  Baste or spritz top with brandy and allow to cool completely before turning out from pan.

When cake is completely cooled, seal in plastic wrap or a tight sealing, food safe container.  Store far away from evil dogs.

Every 2 to 3 days, feel the cake and if dry, baste with more brandy. The cake's flavor will enhance considerably over the next two weeks.

Make it Yourself: Wine Bottle Olive Oil Pourer

This olive oil container has been in the background of many pictures on this little blog.  It might possibly be the most utilized ingredient and container in our whole kitchen.

Five years ago, I found the winemaker Four Sisters at a shop in Portsmouth Virginia where we were living.  As the oldest of four sisters, I knew I wanted each of my sisters to have a bottle with this label.

More than the wine itself, I knew we would treasure the bottles.  I considered different ways we might extend their use beyond a wine container.  I finally settled upon making a wine bottle olive oil pourers for my three sisters and myself.

Transforming a wine bottle into an olive oil pourer is an easy thing to do and a great gift for a wine lover, cook, or anyone who appreciates the fine art found on many labels today.  Here's how:

1) Buy wine.  Search for a label with meaning or one that looks unique.  A plasticized label will hold up better than a paper and glue label.  A green or brown glass bottle is preferred as the darker color protects the oil from light damage.

2) Purchase pouring spout.  I have purchased cheap spouts that don't work a bit, so my advice is to go for quality here.

2) Dispose of wine.  I don't need to advise you about how to do that, right?

3) Wash bottle thoroughly.

4) Fill with high quality olive oil.

5) Top with a spout.

6) Voila!

For gift giving, you might want to package the pourer with a coaster and handmade tag with details about the olive oil.

PS. Keep away from the dog.