Feta Peppers {Recipe}

feta stuffed pepperoncini peppers recipe Feta Pepperoncini Peppers were the star dish of our Julia Child $5 Value Meal. These tangy bites flew off the appetizer plate. The recipe is a cinch to make for parties or as an accompaniment to a salad or dinner at home.

fresh homegrown pepperoncini peppersstuffed pepperoncini pepper recipe

[print_this]

Feta Peppers adapted from Julia Child's The Way To Cook

12 fresh pepperonicini or other small thin fleshed sweet peppers 1/2 cup feta cheese 1/3 cup greek yogurt 1 egg yolk 3 dashes worchestshire sauce 6-12 drops sriracha or your preferred hot sauce 1/2 teaspoon salt 6-10 grinds fresh pepper

1. Preheat oven to 350 degrees F. 2. Cut tops off washed pepperoncinis. Halve and remove pith and seeds. 3. In a small bowl, mix together remaining ingredients. Use the back of a spoon to press chunks of feta until smooth. 4. Spoon mixture into peppers. Arrange peppers on a parchment or silpat lined cookie sheet. 5. Bake for 25-30 minute or until slightly browned on top. Serve warm.

[/print_this]


Great Grandma's Apple Butter {Recipe}

My Great Grandma Davis, mother of my father's mother Joyce, was an old school home cook. She grew a large garden and Grandpa fished to feed themselves fresh and cheap food. Grandma later used her kitchen experience to serve as a school cook for many years in the decades where everything was prepared from scratch on site. Because Grandma lived into her nineties, I grew up knowing her. I remember eating a breakfast of biscuits and jams at her house in Missouri as a very young child. Sadly, she died before I was interested in food and could learn from her depth of home cooking knowledge.

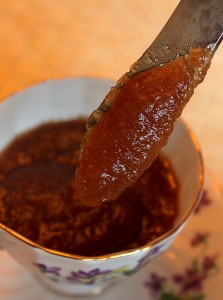
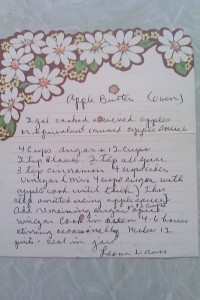
great grandma's apple butter recipeI do know that Grandma put up everything she could, including apple butter. For years, I hesitated to remake her recipe because I was afraid I could live up to her version. But for you, dear blog readers, I sifted through recipe cards at my parents' house and pulled out Great Grandma's Apple Butter.

Just reading Grandma's handwriting stirs up sentimental feelings of opening birthday cards and Christmas gifts lovingly addressed by her hand. Click on the card image to see it larger. I love that she simply wrote 'seal in jars' as if every woman of her day would know exactly how to do that. I consulted the National Center for Home Food Preservation to find the proper canning time.

I suspect I will never alter this recipe because there is a certain nostalgia in making apple butter exactly as my great grandmother did. Not knowing Leona, however, you might want to substitute some brown sugar for the white and change the spices. Ground ginger would play nicely with the other flavors, as would nutmeg. I did reduce quantities and update the recipe to make it slow cooker friendly.

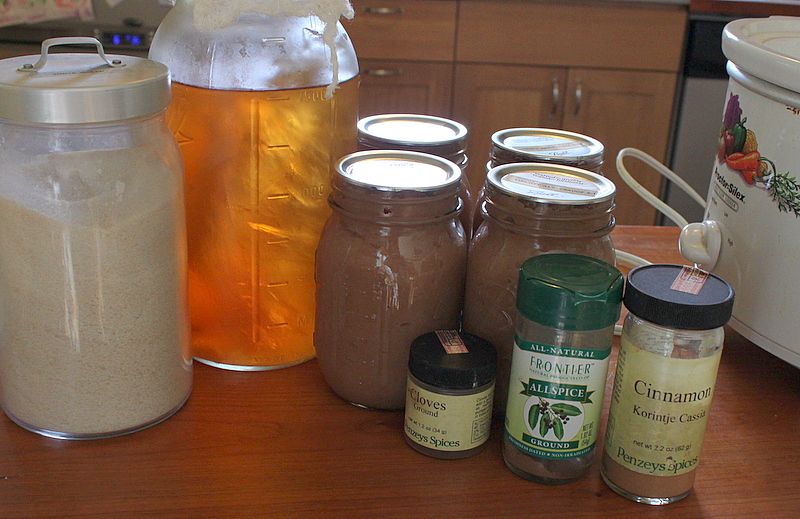
My father made this recipe a few years ago and noted that he would prefer less vinegar. I think the iteration I made with Liberty Pink applesauce and homemade cider vinegar had a perfect balance. We suspect that the variety of apple makes all the difference and you may wish to taste before adding all the vinegar.

great grandma's handwritten apple butter recipeingredients for apple butter recipe


[print_this]

Great Grandma's Apple Butter Recipe

makes 6 half pints

4 pints applesauce, or 8 cups stewed and pureed apples

3 cups granulated white sugar

1/2 teaspoon ground cloves

1/2 teaspoon ground allspice

1 teaspoon ground cinnamon

1 cup cider vinegar

1. Stir all ingredients in a slow cooker or oven safe pan.

2. Cook on high uncovered, or 200 degrees F, for 4-6 hours, or until reduced by half.

3. Fill jars leaving 1/4 inch head space. As the apple butter is very thick, jiggle the jars or stir with a chopstick to release any air pockets.

4. Wipe rims and place two part lids on jars. Place in water bath canner and process for 5 minutes.

5. Remove jars from water and allow to cool for 12 to 24 hours. Prepare and store for up to one year.

[/print_this]


More Davis/Tayse family recipes:

Rhubarb Crunch

Gingersnaps


Why There's Vanilla Brewing {Friday Five}

1) While making cereal snack mix for the annual family camping trip, I saw the recipe on the box for chocolate/peanut butter covered in powdered sugar snack mix. (These mixes have names but they are trademarked and silly.) 2) I had to make it too, despite not exactly possessing most of the ingredients. I subbed chocolate bar pieces for the chips and almond butter for peanut butter.

3) Then I realized the vanilla extract jar ran dry two days ago.

4) But I found vanilla beans in the spice drawer and ran to the computer to search how to make vanilla extract at home. I dumped vodka and beans in a jar leftover from canning apple butter.

5) In four weeks I can make chocolate/peanut butter cereal mix with vanilla. You can bet I made it without vanilla for this trip. This is how I get into trouble in the kitchen: one project leads to another to another. Am I the only one? PS. The CSCC Taste the Future giveaway ends Tuesday.

Homemade Pizza {Recipe}

tossing pizza doughHomemade pizza sometimes begins with the suggestion from Alex that we order in. I remind him that we always regret the greasy crusts. Other times, we have an abundance of vegetable odds and ends in the fridge and pizza sounds like a good way to use them up.

Or we want a fun meal to make with friends or family. One of our recent pizza parties including dough tossing by Alex's brother Ben, a pizza maker at Whole Foods.

Whatever the reason, when pizza making time comes, we have our routine down to a science.

A pizza stone is a must. Careful direction to kids and newbies during the 'decorating' phase is necessary, as too much sauce is a surefire beginning of an unpleasant soggy crust. We use a wooden paddle to shimmy the dough into the oven but a large thin cutting board dusted with cornmeal works fairly well.

Finally, and this is the hardest, the oven door must stay shut during cooking.  The perfect pizza is cooked at consistently high temperature and every opening loses massive amounts of heat.

We can cook only one or two pizzas at a time in our single oven. We start with Lil's pizza (cheese, basil, and capers) and then make one to please the adults in the crowd. After each comes out and rests, we serve slices family-dinner style on a big cutting board in the middle of the table. The oven stays on as other guests make their individual pizzas, sharing pieces as they are ready.

Delivery just can't compete!

home pizza cooking with paddle and stone

Pizza Crust Recipe for 4 10-inch pizzas

1 package (2 ¼ teaspoons) active dry yeast 1 cup warm water 3 cups all purpose flour, or a mix of bread flour and whole wheat flour 4 tablespoons olive oil 2 1/2 teaspoons salt

  1. Dissolve yeast in water in a medium bowl.
  2. Stir in flour, olive oil, and salt.
  3. Mix until well combined, at least 20 strokes. Add more flour if necessary until dough does not stick.
  4. Cover with saran wrap or a towel and let rise for 30-60 minutes, until double in bulk.
  5. If making pizzas immediately, follow assembly steps below. Dough can be portioned and frozen in individually wrapped pieces at this point. To use after freezing, allow to thaw completely and rise a little more before shaping and topping. Allow 3-4 hours at room temperature or allow to thaw in the fridge overnight.

Quick Pantry Pizza Sauce makes approximately 3 cups, enough for 6-8 pizzas

1 tablespoon olive oil ½ medium onion, diced 2 cloves garlic, minced 1 15 ounce can diced tomatoes 2 6 ounce cans tomato paste 1 tablespoon balsamic vinegar 2 tablespoons fresh oregano, minced (or 1 teaspoon dried) 2 tablespoons fresh basil, minced (or 1 teaspoon dried) ½ teaspoon salt, to taste ½ teaspoon black pepper, to taste

1. Heat olive oil in a heavy bottomed pan. Add onions and garlic and cook on medium low heat until onions are translucent, about five minutes. 2. Add remaining ingredients. Cook until sauce is thick and herbs are wilted, about 15 minutes. 3. Use on pizza. Leftovers can be stored in the fridge for one week or in the freezer in an air tight container for up to 6 months.

Assemblyhomemade cheese pizza

1. Heat oven to 450 degrees F. Heat baking stone in oven if you have it. 2. Punch down dough and divide into four equal pieces. 3. Form a ball with one piece. Press it into a small round. Gently thin the center by holding it perpendicular to the ground and pressing with your thumbs together while turning the dough like a steering wheel. Continue to stretch into a bigger round by moving your thumbs out from the center. 4. Place the dough on a paddle, thin cutting board, or the back of a cookie sheet dusted in cornmeal. Do not press the dough onto the surface. 5. Spoon no more than ¼ cup tomato or pesto sauce onto the dough. Spread the sauce with the back of a spoon evenly across the dough. 6. Top with toppings. If toppings are too thick, the bottom of the dough will burn before the top is thoroughly cooked. Try to keep them evenly spread and not too thick. 6. Slide pizza from the cornmeal covered surface by wiggling it gently onto the baking stone in the oven. 7. Close the door and leave it shut for 7 minutes. Check to see if cheese is melted as desired. Try to minimize door openings to keep oven hot. 8. When pizza is done, remove from oven and allow to cool 3-5 minutes before cutting. Keep stone in oven to keep cooking more pizzas!

One final suggestion: If you have leftover dough but not enough to freeze, try topping a final pie with thinly sliced apple, a dusting of cinnamon and bit of shredded cheddar cheese. If you can resist it as dessert, it is the perfect breakfast pizza, warm or straight from the fridge.

How do you 'za?


Added to Hearth and Soul

Peach Cobbler {Recipe}

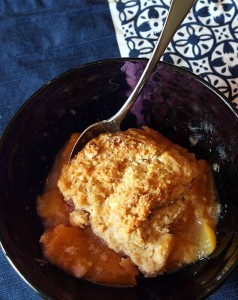
It's Peach Week at Hounds in the Kitchen! See Monday's introduction with a peach cocktail recipe and follow the whole week for preserving tips and a pick your own farm review. buttermilk biscuit peach cobbler recipeTruth be told, I would rather eat fresh fruit than most desserts.

But when I ran out of jars when canning peach pieces, I was left with the perfect beginning to a baked dessert: a pile of juicy, fresh, peeled and sliced peaches.

I piled the peach slices into a pan, topped with sweet buttermilk biscuit dough and baked it to make a cobbler. We ran out of time to eat the cobbler warm and instead enjoyed it as a snack and breakfast straight from the fridge.

NB: Wikipedia has a fascinating article on the definition of cobbler and other cooked fruit with toppings, including brown betty, crisp, crumble, buckle, etc.


[print_this]

Fruit Cobbler biscuit topping adapted from Betty Crocker New Cookbook 7th edition Makes 12 servings in a 9x13 inch pan

8 cups cleaned and sliced fresh fruit such as peaches, plums, cherries, or blueberries sugar to taste (I add none for fresh peaches) spice to taste (I add a little cinnamon, sometimes ginger)

1/4 cup butter 1/4 cup vegetable shortening 2 cups all purpose or white whole wheat flour 3 tablespoons granulated white sugar 3 teaspoons baking powder 1 teaspoon salt 1/4 teaspoon freshly grated nutmeg 1 1/4 cup buttermilk 1 teaspoon vanilla

1. Layer fruit in a 9x13 inch pan. Add sugar to taste and any spices you wish. 2. Stir together flour, sugar, baking powder, salt and nutmeg in a large mixing bowl. 3. Cut butter and vegetable shortening into the flour mixture with a pastry cutter or two knives until the mixture is the size of small peas. 4. In a liquid measuring cup, stir vanilla into buttermilk. 5. Pour liquid into flour and stir just until mixture comes together. Do not over mix. 6. Spoon biscuit mix over fruit in 12 equal portions. 7. Bake at 350 degrees for 35-45 minutes or until biscuits are browned and fruit is bubbly.

[/print_this]


Notes: Recipe added to Hearth and Soul. And, congratulations to Pork Giveaway winner Emily!

Momo Sake {Recipe for Peach Week}

momo sake peach drink recipeWelcome to Peach Week! I declare it so because peaches are in season in Ohio and I love them! Before I get to the fruit of today's post, let me introduce the creator of the recipe, Anna. Anna is a 20 year old Japanese college student staying with us for two weeks. She is a chaperone to a group of 100 Japanese youth staying with host families throughout the state of Ohio. Anna was matched with our family because she like gardening, agriculture, and cooking.

When Anna arrived at our home Thursday evening, I showed her the peach (momo in Japanese) juice leftovers from Wednesday's peach canning extravaganza. With two other ingredients from the fridge, Anna showed me how to make Momo Sake, a delightfully refreshing summer drink.

Her pairing of peach nectar and sake is something I never would have arrived at myself. Cross cultural tastes are one of the things I love about hosting exchange students - they introduce us to the most delicious ideas.


[print_this]

Momo Sake

2 ounces seishu sake or shochu (Anna prefers shochu, I like sake)

2 ounces peach nectar

4 ounces club soda, or to taste

one half cup ice cubes

1. Fill a high ball glass with a half cup of ice cubes.

2. Pour sake, peach nectar, and club soda over ice. Stir vigorously with a spoon for 5-10 seconds.

3. Enjoy!

[/print_this]

Stay tuned for sweet and juicy stories during Peach Week, including a review of Branstool orchard, peach cobbler recipe, and tips for canning.


PS. The pork giveaway ends tonight, Monday, at 8 pm. Leave a quick comment for a chance to win a cool piggy cutting board, $25 gift card, and more!

Sausage Cake {Recipe}

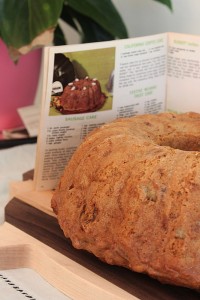
sausage cakeThere are rare times when I post a recipe after making it just once. And never have I posted something that I don't plan to make again. But on the off chance that you have a spare pound of sausage laying around and want to make dessert, behold the Sausage Cake.

Making this cake feels all wrong. The raw meat turns the batter pink and you definitely can't lick the bowl.

The resulting cake is surprisingly tasty to the medieval palate. If you use a mildly flavored sausage, the pork lends very little flavor. Nuts and fruit stud the cake. The texture is rich and dense like any spice cake.

As we shared the cake around, we realized two things. First, my family challenged our palate with a similarly meat-enriched sweet thing when preparing for our Canada trip. Dad was convinced we should take Pemmican, a Native American snack cake of dried fruit and meat. We couldn't stomach it and ditched the idea. Secondly, this cake is dairy free. Perhaps the recipe came from a situation where dairy was scarce?

A hard sauce of apple brandy would improve the plating and presentation. Tasters agreed that it might be good for making into breakfast french toast or bread pudding where the slight hints of meat are more welcome to the palate.

I would truly love to hear what others think of this if they make it. Please come back and leave comments!

PS. Come back tonight for a pork giveaway!


[print_this]

Sausage Cake
from the Nordic Ware 'Unusual Old World and American Recipes' booklet circa 1970s

1 pound ground pork sausage
1 1/2 cups firmly packed brown sugar
1 1/2 cups white sugar
2 eggs, beaten
3 cups all purpose flour
1 cup dried fruit
1 teaspoon ginger
1 teaspoon baking powder
1 teaspoon baking soda
1 teaspoon cinnamon
1/2 teaspoon cloves
1 cup cold coffee
1 cup chopped nuts

1. Preheat oven to 350 degrees F. Grease and flour a bundt pan.
2. Beat pork sausage with sugars in a stand mixer until well blended, approximately 3 minutes. Add eggs and continue beating.
3. In a separate bowl, mix flour, spices, baking powder, and baking soda.
4. Meanwhile, pour 1 cup of boiling water over dried fruit. Soak for five minutes and pour off water.
5. With the mixer on low, alternate cupfuls of flour with thirds of the cold coffee. Mix thoroughly after each addition.
6. When the batter is combined, gently stir in nuts and dried fruit.
7. Pour into prepared pan and bake for 60-90 minutes or until a toothpick inserted in center comes out dry. Cool 15 minutes in pan before inverting to release the cake.
8. Store leftovers in the refrigerator.

[/print_this]


Added to Hearth and Soul.

Potato Chickpea Samosa {Recipe}

On a recent Saturday morning, I woke early and drove to the Worthington Farmer's Market. I was on a mission to buy sour cherries and meet AJ of Sassafras Bakery. Fruit in tow, I introduced myself to the sweet bombshell that is AJ and chatted with my friend Patti who happened to be working the bakery stand too. I couldn't leave without purchasing Sassafras' most hyped treats - the potato & bacon pocket pie and kitchen sink granola bar. homemade samosa recipeI shared the pie with Alex, who was still hobbling around with a piece of an axe in his thigh. It was flaky and savory and oh so delicious. "I could eat a dozen of these," I sighed. "Me too. They're like breakfast samosas," agreed Alex.

One thing led to another and that night we were folding, filling, and frying samosas for the first time.

We used the tome 1,000 Indian Recipes as a guide for the recipe. While I'm not sure we will ever work our way through the whole book, the few recipes we have made are spot-on to the Indian cuisine we eat in the US and what Alex has had on his trips to India. The samosa recipe was another one to add to our permanent file.

The dough is a barely mixed flour and oil one that rests for a few hours to develop gluten. It is divided into equal pieces and rolled into balls. Each ball is then rolled into a thin circle and cut in half.

Each half folds into a triangle pocket by sealing one side from middle of the base across the rounded edge. The other corner is brought across and sealed to the outside. Filling stuffs in and the third edge is sealed.

folding homemade samosa doughfolding samosa wrappertriangle folded samosa doughfilling samosa pocket

The filling can be made of practically anything. Alex and I opted for a fairly traditional potato, onion, and chickpea filling while Lil filled her pieces with leftover chicken.

While stuffing our faces with the savory, slightly spicy, crisp samosas, we realized that the recipe is vegan. Though a little heavy on carbs and not at all low fat, I'll keep samosas in mind for parties where I want to feed people with a variety of dietary needs.

vegan samosa recipeWe made a double batch of dough and filling and fried all of the resulting 48 samosas. What we didn't eat on Saturday we froze.

To reheat with crispness, we pop them in the toaster oven for 10 minutes at 400 degrees F. When we are feeling lazy, 1 minute in the microwave works, though the texture of the wrapping sogs a bit. Potato Chickpea Samosas from 1,000 Indian Recipes by Neelam Batra makes 24

Traditional Samosa Dough

1 1/2 cups all-purpose flour + 1 cup for dusting 2 teaspoons baking powder 1 teaspoon salt 3 tablespoons vegetable oil 1/2 teaspoon coarsely ground ajwain seeds (available through Pensey's) about 1/3 cup water 2 cups oil for deep frying

1. Mix 1 1/2 cups flour, baking powder, salt, 3 tablespoons vegetable oil and ajwain seeds in food processor and pulse a few times to mix.

2. Run motor and slowly pour water until the flour gathers into a semi-firm ball that does not stick to the sides.

3. Remove to a clean bowl, cover with a towel or plastic, and let rest 1-4 hours for the gluten to develop. Dough can be refrigerated at this point.

Potato Chickpea Filling

2 tablespoons canola oil 1 teaspoon cumin seeds 2 teaspoon coriander seeds 1/2 teaspoon ground fenugreek 1/2 teaspoon tumeric 1/4 teaspoon curry powder 1 teaspoon chili garlic paste 1 teaspoon fresh grated ginger 1 vidalia onion 1/2 teaspoon salt (or to taste) 1/2 teaspoon black pepper (or to taste) 1 cup / 8 ounces cooked chickpeas (1/2 can) 2 medium yukon gold potatoes, peeled, cubed and boiled until tender in salted water 1/2 cup water

1. Grind cumin and coriander with a mortar and pestle.

2. Heat oil in a large skillet over medium heat. Add all spices, chili paste and ginger to the oil and stir for one to two minutes, being careful not to burn them.

3. Add onion into seasoned oil. Cook covered for 20 minutes or until caramelized and very tender, adding water after five minutes.

4. Stir in potatoes and chickpeas. Cook for another five minutes while slightly mashing potatoes. Add a little more water to cook as necessary.

5. Allow to cool before stuffing into samosa dough.

Assembly and Cooking

1. Heat oil to 350 degrees in a large deep pan.

2. Divide dough into 12 balls.

3. Roll a ball into a thin 12 inch circle and cut in half.

4. Fold each half into a triangle pocket by sealing one side from middle of the base across the rounded edge. Bring the other corner across and seal it to the outside.

5. Stuff in a tablespoon or so of filling and seal the third edge.

6. Fry in hot oil for 4-5 minutes. Remove to a paper towel lined plate or rack to drain excess oil. Serve warm.


PS. Meet and bid on a date with AJ at the Local Matters benefit Hills Foodie Fair this Saturday.


Added to Hearth and Soul 58.